In the previous spring, a tiny cooking space in Arlington was completely updated. It went from cramped and tired to calm and efficient. The homeowner knew what they wanted but needed a clear plan. The team at Renovate Builders assisted in define the costs, timeline, and rank the necessary repairs.
This renovation demonstrated that strategy and attainable objectives are more important than simply copying styles. DIY kitchen remodels often require ninety days or more. Including a buffer period for finishing touches is a smart move –External link about kitchen remodeling.
This guide offers useful strategies for U.S. homeowners. We will discuss establishing a concept and cost limit, design, and checking subfloor and insulation. Additionally, we look at wiring and illumination, cupboards and storage, durable materials, and when to hire pros like Renovate Builders.
Treat this post as a step-by-step tool for your strategy. Get quotes from Renovate Builders and trusted suppliers before starting. Thorough planning ensures a seamless remodel and avoids surprises.
Planning Your Kitchen Renovation: Vision, Budget, And Timeline
A successful remodel starts with a solid strategy. The roadmap links your ideas to financial and timing reality. First, picture how you desire the space seem and operate.
Think about color themes, style, storage needs, and illumination needs. Ensure the cooking space complements the property’s character for a cohesive look.
Define A Clear Design Vision
Write down of essential items and nice-to-have features. Pick out products that fit your lifestyle. Think about cabinet layout, pantry space, and task lighting.
Utilize visual boards or Pinterest to gather ideas. This ensures all parties aligned on the shared goal.
Set A Viable Financial Plan With Reserves
Establish a strict spending limit and include 10–20 percent for surprises. Factor in expenses for labor, appliance upgrades, and concealed damage fixes. Review the difference for RTA cabinets versus semi-custom and factor in installation hours.
- Project supplies and work costs independently.
- Set aside money for permits and inspections.
- Reserve extra for unexpected repairs.
Establish A Feasible Schedule And Interim Kitchen Setup
Anticipate that a total overhaul to take several months. Schedule beginning times, approvals, and sequencing with your builders. Communicate the schedule with family to adapt daily life.
Set up a makeshift cooking zone with basics: an induction cooktop, microwave, mini-refrigerator, essential pots, and durable dishes. Budget for takeout during the messy stages. A clear temporary kitchen setup lowers anxiety and keeps meals practical.
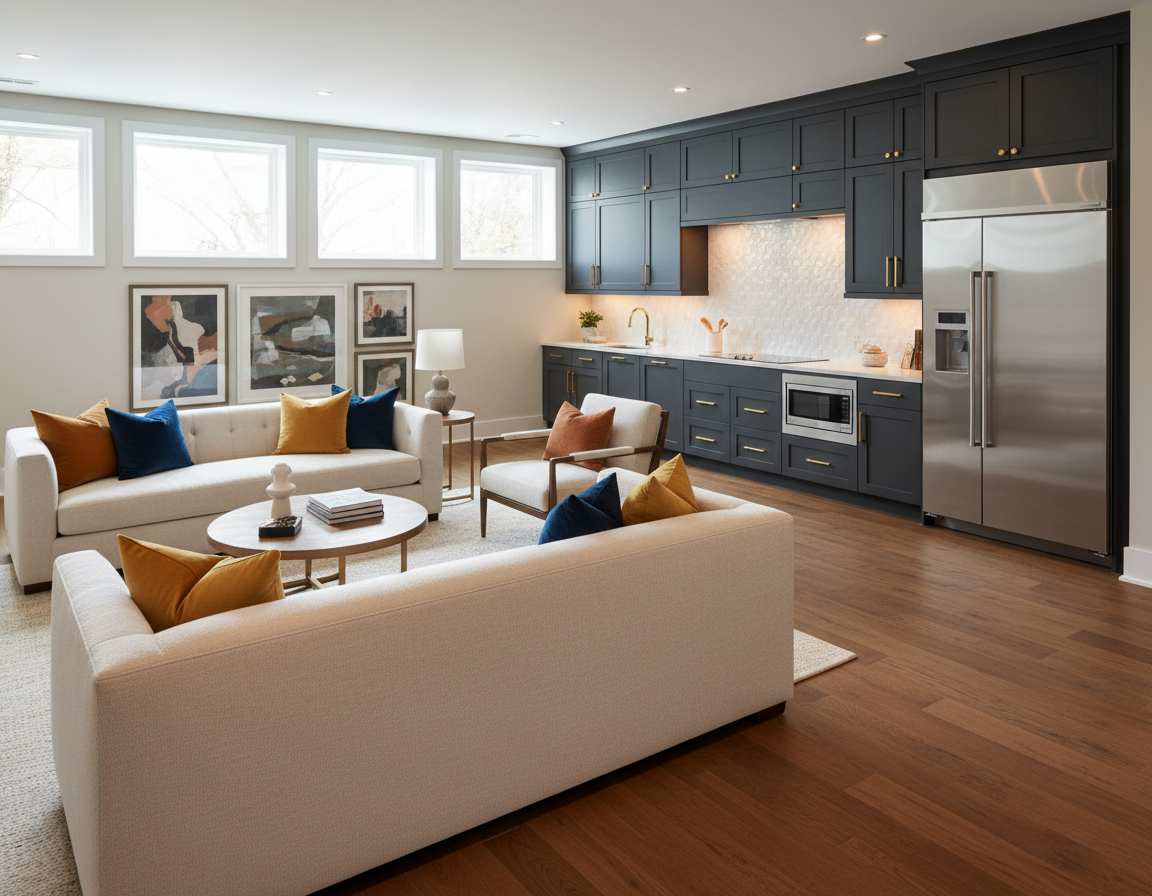
Key Design Rules For Usability And Movement
Good design renders a cooking space functional and enjoyable. Use fundamental concepts to design an area matching your everyday requirements. This advice highlights arrangement, movement, and minor elements that have a major impact.
Work In Zones For Efficient Cooking
Split the space into distinct areas: preparation, cooking, cleaning, pantry, and dining. This organization streamlines activities and cuts down on steps between areas. Employ open storage such as hanging racks and open shelves for items you use often.
Place utensils you use frequently in the preparation area. Place large pans close to the range. Martha Stewart’s zone ideas are a great guide for these tips.
Ensure Adequate Space And Traffic Paths
Plan broad paths and a spacious center to prevent congestion. Target at least 42 inches for one cook and 48 inches width for two or more people. Streamlined countertops and smart appliance placement enhance movement without sacrificing storage.
Ensure cabinets and pull-outs don’t collide when extended. These little tests make your kitchen layout ideas work well in daily use.
Think About The Triangle And Equipment Location
Locate key appliances so the flow is intuitive. The traditional triangle layout is key, but adjust it for modern needs like wall ovens. Use islands wisely, ensuring enough depth and space for safe movement – The website about kitchen remodeling.
Think about ventilation and natural light when placing appliances. Incorporate elements such as a water filler by the cooktop if useful for you. Smart appliance placement is a key part of enduring utility.
| Key Area | Tip | Advantage |
|---|---|---|
| Activity areas | Create dedicated prep, cook, washup, storage, seating areas with reachable storage | Reduced steps, quicker cooking, better order |
| Distances | Keep aisles 42-48 inches wide; test door clearance | Better flow, safe movement, no bumping |
| Workflow | Position key units for easy reach; ensure island space | Easy workflow, less tiredness, better flow |
| Gadget placement | Plan for water access, vents, and windows near machines | Improved functionality, better air quality, brighter workspace |
Flooring Base, Insulation, And Framing Issues To Fix Now
Before closing the walls, consider what’s under and behind the new surfaces. A thorough base floor inspection and improving thermal padding preserve the space for a long time. Addressing framing problems now spares you from future expense.
Examine And Fix Broken Underlayment
The underlayment is vital for flooring, islands, and cabinets. Vintage properties commonly have rot or warped boards. Closely examining the base shows if you need repairs or a full replacement.
Utilize heavy-duty plywood for a solid feel beneath heavy units. Secure fixing eliminate noise and keep surfaces flat. Addressing little things today stop large issues in the future.
Improve Wall Padding For Coziness And Energy Savings
Numerous existing walls do not have sufficient padding. Installing mineral wool or high-density fiberglass boosts coziness and saves on power. Select water-safe products around plumbing and glass.
Inspect for fungal issues around sinks, stoves, and windows. Swap out old stuffing and install barriers to prevent mold and dampen noise.
Design For Concealed Essential Utilities
Uncovered framing provide an opportunity to modernize pipes, ducts, and structure. Run new lines where logical. Vent kitchen exhaust outdoors for improved air quality and legal adherence.
Document alterations for permits and maintenance. Collaborate with the Renovate Builders team regarding structural edits. Proper planning keeps your project on track and safe.
| Component | Look For | Fix | Result |
|---|---|---|---|
| Underlayment | Decay, bending, screws, depth | New plywood installation | Stable base for cabinets; prevents squeaks and leveling issues |
| Wall cavity | Current fill, water, rot | Add mineral wool or dense batts; fix mold | Cozy, efficient, quiet room |
| Water & Air | Path of pipes, exhaust exit, duct width | Move lines; exhaust outside; bigger pipes | Good airflow; dry air |
| Skeleton | Load paths, beam sizing, header condition | Engineer-reviewed reinforcements; sistering or new headers | Secure spaces for new layouts |
| Documentation | Licenses, notes, bills | Save files and pics; track edits | Helpful for future work or sale |
Intelligent Wiring And Illumination Plans For Security And Adaptability
Proper power planning starts with an adaptable schematic. Leave extra wire length into cable runs and use adjustable electrical boxes. This way, plugs and controls can move slightly at the end stage. List tasks detail for inspection but leave room for sensible changes with your contractor.
Design electrical plans with wiggle room
Officials anticipate installers to match the signed drawings. Install additional plugs for future appliances and place dedicated circuits where high loads are likely. Maintain a log of breaker box load, breaker sizes, and future updates to avoid surprises when inspected.
Layer lighting for task and ambiance
Blended lighting provides sight and atmosphere. Blend pot lights with hanging lamps above the counter, under-cupboard strips for prep, and wall lights to cut shadows. Map switches and add rheostats so you can change scenes without new cables.
Prepare for power-hungry units
Power-intensive gear demands separate power and proper service sizing. Check real sizes and power specs for stoves, dual ovens, wine refrigerators, and compact freezers prior to install. Collaborate with vendors and contractors to ensure wiring fits the machine needs.
| Topic | Task | Result |
|---|---|---|
| Service flexibility | Leave slack, use moving boxes, add pipes | Makes final layout changes simple and permits easier inspections |
| Power points | Install extra outlets including GFCI and dedicated circuits | Future-proofs power needs |
| Layered lighting | Combine ceiling, pendant, under-cabinet, and wall lights with dimmers | Better work light and nice mood |
| Machine prep | Verify specs; save power lines | Stops moving costs and keeps it safe |
| Communication | Show prints to sparky, carpenter, and vendor | Better workflow and fewer errors |
Follow these kitchen remodelling tips & tricks to ensure safety and ease as top priorities. Clear plans for gear and lights reduce rework and keep the project on schedule. The Renovate Builders team and certified sparkies can help translate a good power plan into a seamless installation.
Cupboards, Organization Ideas, And Affordable Improvements
Selecting intelligent storage is essential for a functional workspace. Select tough components like furniture-grade plywood for the cabinet bodies. Hardwood doors are ideal for high-wear areas. Assembly-required units cut costs but take effort to assemble.
Request pieces of fronts and stains to verify standards. Verify vendor reviews to locate the sweet spot of cost and value.
Pick tough builds and honest suppliers
Avoid only checking costs when buying cabinets. Examine the durability of runners, hardware, and rear panels. Ask about fitting testimonials and warranties from the sellers.
Partnering with Renovate Builders they can help with finding, checking, and fitting. This preserves hours and minimizes danger while staying within your budget.
Optimize upward space
Use tall wall cabinets and shallow open shelving to add storage without making the room bigger. Add magnetic strips, pot racks, and hooks to clear the worktop. Employ upright separators and sliding drawers to easily reach to deep shelves.
These tactics help you use vertical space well and keep items visible and handy.
Low-cost changes that matter
Target improvements that transform the style and utility without high cost. Refacing fronts, changing handles, and a new backsplash create a major change. Replacing the basin, tap, or fixtures also adds value and enhances everyday life.
| Item | Typical Cost Range | Function Effect | Time needed |
|---|---|---|---|
| Resurface doors / repaint | $800 – $3,000 | Modernizes style | 2–5 days |
| Hardware swap | $100 – $600 | Great look, fast | 1 day |
| Flat packs | $2,000 – $8,000 | Lower cost, requires assembly | 3–7 days (DIY) |
| Solid boxes | $6,000 – $18,000 | Tough, good equity | 1–2 weeks (install) |
| Shelves & Racks | $150 – $1,200 | Quick grab, visible | 1–3 days |
| New sink and faucet | $300 – $1,800 | Better use and look | 1 day (pro) |
Begin with utility during your renovation. Utilize dividers, pull-outs, and labeled zones to cut mess. Put frequent tools at knee and eye level for quick grabbing.
As you prep, dimension the room and machine sizes accurately. Apply the formula (Total Words/100)*2 to manage word frequency. Scatter hints throughout your documents for clear priorities and strong results.
Flooring, Countertops, And Selecting Durable Materials
Choosing the right surfaces is vital for daily function and long-term costs. Focus on resilient finishes able to resist messes, traffic, and cleaning. A wise pick means fewer repairs and kept money.
Select Flooring For Life And Cleaning
Tiles of porcelain or ceramic work well with water and handle traffic. Vinyl plank offers a waterproof, wood-like look at a lower cost. Wood floors bring coziness but needs more care and marks up or swells from leaks.
Before laying new flooring, check and fix the subfloor. A firm foundation stops creaks, gaps, and premature failure. Ensure you examine the base state at the start to avoid surprises.
Pick Counters Fitting Your Life And Wallet
When picking countertops, consider your cooking habits and cleaning needs. Quartz is easy to clean and tough. Marble and soapstone are timeless but require sealing. Laminate and solid-surface options look good and save money.
Counter edges are significant for everyday function. Curved profiles conceal damage well, whereas straight edges appear contemporary. Confirm dimensions and overhangs during templating for a perfect fit.
Choose A Basin And Taps For Utility
Select a wash station matching your meal prep and cleaning style. One-basin sinks are great for big pots. Double-bowl sinks divide washing and cutting. Apron-front sinks bring style and deeper basins. Chef sinks and Ruvati-style sinks feature integrated tools to speed up work.
Accurate sink selection saves costly rework. Confirm measurements when measuring and check tap hole needs. Choose durable faucets and think about a filler above the stove for big meals. A well-chosen sink makes the room work and lasts.
DIY Realities, Project Management, And Working With Renovate Builders
Minor renovations seem easy until they don’t. You need to weigh hours, ability, and routine prior to beginning. A space filled with cartons and equipment fast alters your schedule.
Understand the price of Self-Renovation
Homeowner tasks take longer than expected. Building flat-packs eats up weekends. Plan for waits on hard jobs and finish work.
Engaging professionals and teamwork
Contract specialists for structural, electrical, and plumbing work. They mitigate liability and meet codes. Lots of people engage Renovate Builders to handle papers and scheduling.
Organize site logistics and waste management
Plan for staging areas and entry routes ahead of time. Machines and cupboards arrive in large packaging. Conserve room by flattening cardboard as they arrive.
Managing the renovation
Plan tasks to stop stoppages. Make a timeline for all stages. Share the schedule with all workers.
Practical checklist
- Write down license requirements and check times.
- Block off delivery corridors and a storage zone.
- Check all sizes twice.
- Schedule trash pickup to match demo days.
- Establish work hours for contractors.
| Task | DIY Time Estimate | Hire Help If |
|---|---|---|
| Building cabinets | Weeks of work | For exact fits or layout changes |
| Power lines | Not recommended for DIY | Always hire licensed electricians coordinated by Renovate Builders |
| Pipes and drains | Dangerous; needs permits | Hire a licensed plumber to avoid leaks and failed inspections |
| Finish carpentry and trim | Doable if skilled | Hire pros for complex profiles or seamless finish |
| Trash and site | Needs plans; some work | Let the team manage waste |
Apply remodel advice to simplify choices and reduce waste. As the project expands, make a call whether to press on as a DIY project or get assistance. If you want less hassle, contract the team to combine hands-on craftsmanship with disciplined project management for renovations and tight site logistics.
Final Thoughts
A successful kitchen remodel needs a clear vision and honest finances. Put in a reserve for unexpected costs. Follow key design principles: map out areas, inspect base and warmth layers, and give more time for repairs.
Plan for the job to be usable in roughly 90 days. Factor this in when planning the update.
Actionable tasks can avoid costly rework. Set up a temporary kitchen and have pros check measurements for sinks and countertops. Add extra electrical capacity using movable fittings.
Use layer lighting for tasks and ambiance. Pick tough floors and tops. Maximize vertical storage for economy and room, remembering upkeep.
Decide when to DIY and when to call experts. Easy changes can save money, but structural, electrical, and plumbing work require certified pros. To do it right, reach out to Renovate Builders for precise measurements, permit handling, and professional delivery.
Related: Appliance Repair Solutions For Modern Kitchen Appliances